|

ASROC HANDLING & LOADING
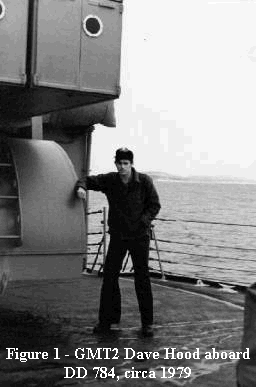
By Dave ("Boomer") Hood, GMT2, USS McKean (DD 784)
Dedicated to the memory of Thomas Best. A fellow ASROCATEER
 RECEIVING AND INSPECTING
THE WEAPON RECEIVING AND INSPECTING
THE WEAPON
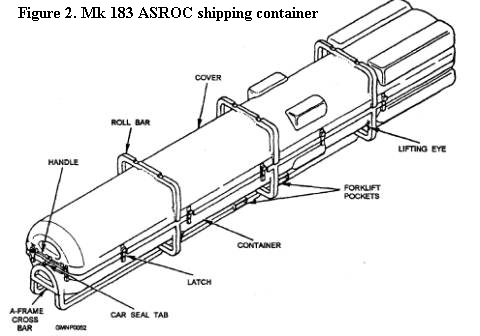
When an ASROC weapon is received by a firing ship
(Destroyer, Frigate, Cruiser) it will arrive in a shipping container, commonly
called a coffin. Once the weapon is on deck inspect the container for proper
stenciling and any visual damage. (Dents, missing parts, corrosion.)
Relieve pressure in the container by depressing the bleed off valve and
then remove the upper half of the container.
INSPECT THE WEAPON
The color of the weapon’s warhead indicated what type of weapon it was.
Blue – Inert. A training shape used to familiarize
the handling team with loading procedures.
Orange - Exercise. No explosive. The warhead is filled with lead shot and
sea dye. It was designed to
be recoverable. It may contain
recording devices so that technicians could analyze the weapons track and
attack. The rocket motor is
certainly real and needs to be treated with all due respect and safety
precautions.
Green with yellow bands. A war shot torpedo. The
explosive warhead may contain either H6 or PBXN explosive.
The Marine Rifle Squad that accompanies it during its transit and
transfer can readily identify a nuclear depth charge ASROC.
 Are there any
visual defects? Are all components installed? Fins. Logbook. Umbilical cable.
P1 shorting cab plug. Nose cap. Sea dye marker in the nose cap. Thrust
neutralizer. Any standing water or moisture in the bottom of the container. Are there any
visual defects? Are all components installed? Fins. Logbook. Umbilical cable.
P1 shorting cab plug. Nose cap. Sea dye marker in the nose cap. Thrust
neutralizer. Any standing water or moisture in the bottom of the container.
Once it passes a visual inspection, the weapon is then
physically inspected. Are there any cracks? Do the components mate up? Are the
explosive blocks used to separate the components in-flight installed correctly?
Of
all the weapons I received, only one had a defect. An exercise torpedo ASROC
arrived with a depth charge nose cone on. The torpedo nose cone is slightly
smaller. We loaded the weapon
anyway and, the next workday returned the nuclear nose cone to the USS DIXIE
AD14 where we swapped for the correct part.
ASAFETY PRECAUTION!
Establish H.E.R.O. (Hazards of Electronic Radiation to Ordnance) Safety.
Establish Shipboard Weapons Security.
 MOVING
THE WEAPON MOVING
THE WEAPON
If the weapon is satisfactory and you have signed custody
for it, now you must put it somewhere. Because
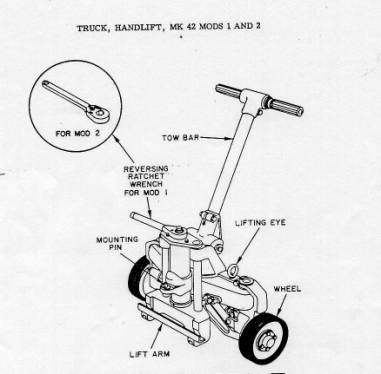
the weapon weighs 1500 pounds, special equipment is required to move it on top
of a ship’s deck. See at left, Figure 3 -the
MK 42 Handlift Truck.
From their
storage space, retrieve your MK 42 Hand-lift trucks (quantity, pair. Unit of
issue, 2 each.) These look like two-wheeled floor jacks with a ½” ratchet on
top. Maneuver a Hand-lift truck onto each end of the lower portion
of the shipping container (the half with that contains the weapon) and attach to
the proper recess. Using the ratchet, take up the slack. Stop when you meet
resistance. Then, with one person on each truck, synchronize your lifting until
the container is fully off the deck. The
container can then be rolled on the deck.
LOADING INTO A MAGAZINE
Should you wish to transfer your weapon to a magazine for
storage, remove the magazine door ramps from their storage brackets and place
one on the inside of the door and one on the outside of the door.
You may then roll your container into the magazine.
ASAFETY
PRECAUTION! The smoking lamp is OFF while handling weapons.
Inside the magazine, cigarettes, pipes, cigars, matches, lighters, keys
and tools capable of producing a spark are prohibited.
Station someone OUTSIDE of the door to ensure that handling personnel do
not bring these items inside the magazine. (Chewing tobacco or snuff is
authorized provided the users do not need to spit.)
Place the container under the Overhead Magazine Loader
Crane. Move the Overhead crane over the weapon and attach to the ASROC Missile
Rail Slots located on the Missile Airframe Upper Clamshell.
Disconnect the ASROC Missile Shipping Container Retaining Bands that
secure the missile to the container. Using
synchronized operation of the Hand-lift truck elevation/depression ratchets,
DEPRESS (lower) the container until the weight load has been transferred to the
Overhead Magazine Loader Crane.
ASAFETY
PRECAUTION! Prior to attaching any ASROC missile to the Overhead Magazine
Loader Crane, inspect the Overhead Magazine Loader Crane for current Weight Test
Inspection. Inspect for rust,
damage, or any missing parts.
Using the pulley system, raise the ASROC weapon high
enough to clear the chocks and move the crane fore & aft and laterally as
necessary to place the weapon over the desired storage chocks.
The now-empty container may be removed to any desired location.
Using the pulley system, lower the weapon onto the bottom
portion of the storage chocks until the weight of the weapon is transferred onto
the chocks. Release the Overhead Magazine Loader Crane from the ASROC Missile
Rail Slots and move the Overhead Magazine Loader Crane to its normal storage
position. Attach the upper portion of the storage chocks and install the
stainless steel bolts, washers and nuts. Tighten with brass or aluminum wrenches
only.
 ASAFETY
PRECAUTION! The ASROC missile is to be stowed with its
motor end facing the ASROC Magazine Bulkhead Blowout Port.
(On a FRAM these ports are on the fore end of the bulkhead. Therefore,
the weapon should be facing aft in the magazine.) ASAFETY
PRECAUTION! The ASROC missile is to be stowed with its
motor end facing the ASROC Magazine Bulkhead Blowout Port.
(On a FRAM these ports are on the fore end of the bulkhead. Therefore,
the weapon should be facing aft in the magazine.)
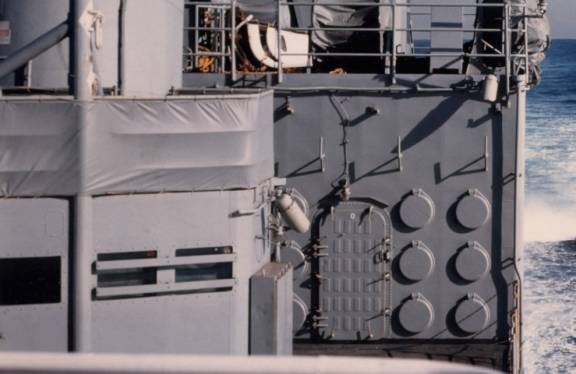
Once the weapon is secured in the chocks remove the
thrust neutralizer and place it in storage. Mounted in the magazine bulkhead are
Blowout ports. If a weapon should have an accidental motor ignition while in the
magazine, the blast will be blown out the Blowout port and vented OUT of the
magazine. (See Figure 4 at left - Blowout ports in the
ASROC bulkhead (USS McKEAN DD-784)
ASAFETY
PRECAUTION! In the event of an accidental motor ignition in the ASROC
magazine, do not stand in front of the Blowout ports until motor ignition has
ceased.
LOADING AN ASROC MISSILE INTO THE LAUNCHER
Select which type of payload you wish to load into your MK 112 ASROC launcher.
Select that cell you wish to load your payload into.
ASAFETY
PRECAUTION! Ensure that all weapons handling is done in an approved
weapons handling area. Ensure the Bravo flag is flying.
Ensure HERO (Hazards of Electronic Radiation to Ordinance) standards are meet.
Ensure appropriate security precautions have been meet.
For FRAM 1 ships:
Remove the canvas cover off of the ASROC Loader Crane.
Inspect the sight glass in the ASROC Loader Crane Hydraulic Pump Sump for
proper hydraulic fluid level. (The sump is located in the Oil King Shack. It’s
not uncommon to find that the Oil King has accidentally broken the sight glass.)
Open the hatch to the ASROC Loader Crane Rail Storage
Locker. (The locker is that metal container 4’x4’x15’ on the ASROC deck
next to the motor whaleboat. It
will contain the loader rail, lockers for the MK13 RTDC thermal batteries, cans
of PD-680 solvent, bails of rags and is a handy place to store 10-speed bicycles
and SCUBA gear – all of which must be hidden prior to an N.T.P.I.)
Manually rotate the ASROC Deck Loader so that its aft end faces Rail
Storage.
Slide the loader crane out on its rollers and mate it with the ASROC Deck
Loader. Disengage the Loader Rail from the overhead track in Rail Storage.
Hook up the QD hydraulic hoses from the ASROC Deck Loader to the ASROC
Loader Rail rammer.
Activate the ASROC Deck Loader hydraulic pump.
Manually rotate the ASROC Deck Loader so that it is now athwartships (along
the beam and not along the keel).
Using hydraulic power, raise the ASROC Deck Loader.
Using the MK 42 hand-lift trucks, maneuver a weapon (in the lower half of a
shipping container) UNDER the ASROC Deck Loader.
ASAFETY
PRECAUTION! Ensure the warhead portion of the ASROC missile goes
underneath the FRONT portion of the ASROC Loader Crane and the rocket motor end
(with the installed Thrust Neutralizer installed in the rocket motor and
properly torqued to 100 ft/lbs. +/- 10 ft/lbs.) under the ASROC Loader Crane
Rammer.
Remove the blast cover (“Elephant Skin”) from the aft end of the ASROC
cell to be loaded.
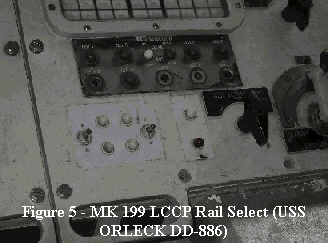
From the right-hand panel of the MK 199 ASROC Launcher Captain’s Control
Panel select the cell to be loaded. This will open the front doors, extend the
rail and release the snubbers.
 Lower the ASROC Deck Loader until
it is just above the ASROC missile. Lower the ASROC Deck Loader until
it is just above the ASROC missile.
Using the Elevation/Depression ratchet on the MK 42 hand-lift trucks, RAISE
the ASROC shipping container until the weapon’s T-rails (located on the
missile’s Airframe Separation Assembly Section) mates with the cutout recesses
in the ASROC Loader Rail.
Using the rammer hand-crank, move the weapon forward so the t-rails clear
the rail cutouts.
Using the Elevation/Depression ratchet on the MK 42 hand-lift trucks, LOWER
the ASROC shipping container until it is just off of the ground.
Using the ASROC Deck Loaders Hydraulic elevation control handle, raise the
weapon high enough so that the now empty shipping container can be taken out of
the loading area.
Using the ASROC launcher’s train air drive motor, rotate the launcher to
the proper degree for the desired cell to be loaded.
 Crawl
into the ASROC launcher carriage and, using a slotted screwdriver on the proper
Guide Drive Pin Solenoid, pop the solenoid to engage the Guide Drive Pin with
the Elevation Torque Tube. See Figure 6 - Guide
select solenoid found inside the MK 7 Carriage (USS ORLECK DD-886). Crawl
into the ASROC launcher carriage and, using a slotted screwdriver on the proper
Guide Drive Pin Solenoid, pop the solenoid to engage the Guide Drive Pin with
the Elevation Torque Tube. See Figure 6 - Guide
select solenoid found inside the MK 7 Carriage (USS ORLECK DD-886).
Using the ASROC launcher’s elevation air drive motor, elevate the
cell to be loaded to the proper elevation angle (measured in MINUTES) so that
the Loader Rail can be mated with the cell’s Rail Supports.
A Helpful hint.
Hopefully, you will have all of this loading data written down in a logbook. Do
not lose that logbook. It will simplify your life.
On the side of the Loader Crane Pivot Head is a big red handle. That allows
the Pivot Head to pivot. Pull the handle.
Using the Elevation Air Drive Motor, elevate the desired cell to the proper
angle (measured in MINUTES) as recorded in your Loading Data Logbook.
Verify the proper relationship between the selected cell to be loaded and
the ASROC Loader Rail by sliding the T-RAIL tool along the slots in the
Launching Rail and the Loader Rail. The T-RAIL tool should slide along freely ON
BOTH SIDES of the Loader Rail.
A
Safety Precaution! If the T-RAIL tool does not slide freely DO NOT ram
the missile from the Loader Rail into the cell. It will bind on the track.
Damage to both the ASROC weapon and the Mk7, Mod 1 ASROC Launcher Guide may
result. Make minor adjustments to either the elevation or train angles (or to
both) and then check the angle relationship with the T-RAIL too.
Use the ASROC Deck Loader’s Hydraulic control to Power Ram the missile
into the cell. Power ramming will cease when the missile still has approximately
12” to go.
Using the Restraining Latch Release Tool, manually pull down so the
RESTRAINING LATCH can receive the missile.
 Using
the hand crank on the end of the ASROC Deck Loader Rail, ram the missile the
rest of the way into the cell. The sailor holding down on the Restraining Latch
Release Tool will feel the weapon seat itself into the Restraining Latch. He can
now release tension from the tool. Using
the hand crank on the end of the ASROC Deck Loader Rail, ram the missile the
rest of the way into the cell. The sailor holding down on the Restraining Latch
Release Tool will feel the weapon seat itself into the Restraining Latch. He can
now release tension from the tool.
Use the Elevation Air Drive Motor to depress the selected cell to the
proper angle (measured in MINUTES) so that the ASROC Loader Rail can be detached
from the cell’s Rail Supports.
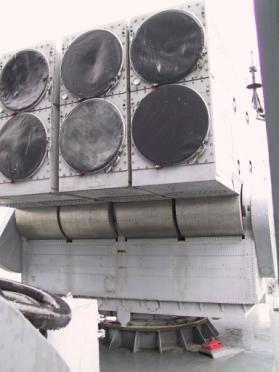
From the aft end of the cell, attach the firing umbilical cable to the
missile and to the cable terminal. Tighten with a cable spanner. Re-install the
blast cover to the aft end of the cell. See Figure 7-at
left. Aft end of MK 112 ASROC Launcher showing "Elephant skin" blast
covers. Note that cell thermometers are missing from some of the cells. (USS
ORLECK DD –886)
If no other ASROC weapons are to be loaded, secure the ASROC Loader Rail and
Deck Loader. If more ASROC weapons are to be loaded into the MK 112 ASROC
Launcher, repeat the above steps for each cell to be loaded.

|